I apologize for this week's Think Tank Tuesday for being late. I'm having some health issues with a family member and it's not good so I've been spending a great deal of time with them and dealing with the news.
This week is all about labeling and organizing. I know organizing can be super time consuming, but it really does help out in the long run. Labeling can be as simple as a piece of tape! Trust me. I used painters tape on all of my bins, shelves, and boxes while unpacking my studio. There's still some painters tape lingering around waiting for labels to be made. Don't use a pen or regular marker with any tape though. Use a Sharpie or a marker that will dry on tape. Do a test run to check it out. There's nothing more annoying than smeared labels and being covered in ink. Not to mention the fact that you have no idea what's what anymore.
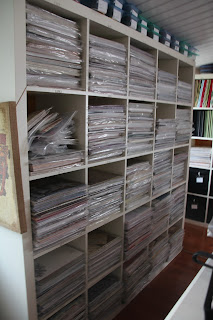 |
| Ikea Expedit |
I have two Expedit's from Ikea and they hold all of my paper, cardstock, and albums. I had no idea how I was going to label them. I couldn't make labels that were six inches long because they're be ripped up every time I took something off the shelf. Time to come up with a plan....
What look did I want? I love all things distressed and old and worn. Thankfully this look works well in my day to day life. A house full of furkids will make you go along with dents and dings.
 |
| Supplies laid out |
While I do love many of the pieces Tim Holtz has released, I realized it was too impractical to use metal bin labels. I love the number plates he has, however, I needed 50 of them! I shopped around and wasn't happy with what I found especially considering how few pieces you get in a package no matter who makes them.
Granted, 50 is a lot, but what was I thinking? Hello! I have hundreds of stamps at my disposal. Hundreds of dies, punches, and Cricut cartridges. Why not make my own distressed number plates? So guess what I spent an afternoon doing? You guessed it! Best part of this is that it cost me NOTHING! I used things I already had in my studio.
One issue I ran into was finding a punch or a die small enough. That would have been easier on my Cricut, but I really wanted to use a punch or die. Sometimes they give more of a rougher edge and aren't cut so clean. I did want this distressed after all. I did a few test runs with different punches and dies before making a commitment to this punch. It had the label holder look I was going for.
 |
| EK Success punch with my labels |
The punch I used is from EK Success. I believe I purchased it from Hobby Lobby awhile back. Bring a couple with you! Or if you have a smartphone, find one of the 40% off coupons online and show the cashier. No reason to pay full price for a punch!
The stamp set is from Studio G and the inks are from
Close To My Heart.
 |
| Complete labels |
I began by punching out 50 labels. Then I distressed the edges with Chocolate Distressing Ink from
Close To My Heart. I made two piles of 25 each. I didn't want to mess up the numbers and have to make more labels. Punching anything 50 times isn't a party, but it was all worth it. Each pile was turned into three piles. I needed a pile for the 100's, 110's, and 120's for the first Expedit and a pile for the 200's, 210's, and 220's for my second Expedit. Instead of changing the stamp every single time I stamped, I stamped all of my 1's, then my 2's, 3's, etc. I didn't use the numbers in a line. I wanted them to be off kilter from each other. It was supposed to look hand made and old. And by doing each number individually if one was a little crooked or off center, it wasn't a big deal. None were perfect. So much less stress this way!
 |
| Labeled Expedits |
How did I attached the labels? I wanted something that was removable. Who knows when I'll reorganize and move things around. I change things quite often. So I needed something that I could easily remove without damaging the Expedits. Glue Dots to the rescue!
 |
| Inventory notebook |
How do I know what's in bin 110? Easy. I have a notebook I wrote down all of the contents of my Expedits in. Eventually, I will turn that into a spreadsheet. I'm waiting until I am satisfied with the layout of my paper packs. I'm pretty close to being there!
So there you have it. Labeling can be easy and cost you practically nothing. I had all of the supplies on hand. Aside from a few drops of ink and half a sheet of 8 1/2" x 11" cardstock, this project cost me nothing. Not bad for 50 labels especially since the ones I was going to order online would have cost me about $60!! YIKES! Do you know much paper I could buy with that? Seriously!
Until next time *
It's spring. Get organized! It will save you time later.


No comments:
Post a Comment