Showing posts with label Hobby Lobby. Show all posts

Thursday, September 8, 2011

Paints and Metal

Paints and Metal. Surely not something you read about every day, right? Hobby Lobby was a dangerous place for me last week. I got two more metal drawer sets. These weren't just unfinished, scuffed up metal. These were spray painted in a paint room somewhere in China.

Originally one was bright white and the other was bright blue. The colors were yucko in my studio. I needed to distress these bad boys! Remember, Tim Holtz and Anna Griffin are my crafty idols. So you've got the vintage, old, worn, tattered, dragged through a hurricane look going on. A great look, right? :)

I started by sanding the finish to roughen it up a bit and remove any shiny coatings they may have had. If you don't rough up the surface a bit, it won't want to take paint or ink. This project is all about the acrylic paint stash. It was so lovely digging them out of the dust.

There are artist acrylic paints. You can purchase some of these in the chain craft stores. Others, you can only get from art supply shops. These are not the acrylic paints you get in bottles on sale at AC Moore for 2 for $1. Just want to clarify. The color names are all from the pigments they are made from.

Here are the paints I used on the white set of drawers:

Liquitex Basics:
Red Oxide
Burnt Siena
Cadmium Red Medium Hue
Raw Siena
Burnt Umber

Martin/F Weber Co - Prima:
Alizarin Crimson

Jo Sonja's:
Indian Red Oxide
Brown Earth

Windsor & Newton - Galleria:
Mars Black

Daler-Rowney:
Copper (MIT)


These are the paints I used on the blue set of drawers:
M Graham & Co:
Quinaoridone Violet

Windsor & Newton - Galleria:
Permanent Magenta
Winsor Blue

Daler-Rowney:
Purple
Deep Violet

Liquitex - Professional Grade High Viscosity:
Dioxazine Purple
Prussian Blue

Martin/F Weber Co - Prima:
Iridescent White

Liquitex - Basics:
Iridescent Silver
Acra Magenta

Jo Sonja's:
Red Violet
Carbon Black
Storm Blue
Colony Blue


There are multiple layers of different paints. I wiped off some paint here and there. I sanded some wherever it looked like it needed it. Mostly, I just dry brushed the different paints on. Each piece doesn't have all the same colors.

I didn't want these to look brand new. The bright colors just aren't my thing. I like old, worn stuff. Dark colors are also my thing....Maybe it's from all of my time in the Adirondack Mountains and the Great Smoky Mountains. No hot pink there!

Now if bright colors are your thing, you can still do this! Just use brightly colored paints. Same techniques. No biggie. Anyone can do this!

Oh and a paint clean up tip! I put all of my paints on a styrofoam plate. They hold a lot of colors! And when you're all done, you just throw it away. No clean up! Just make sure you put it in a trash can that is lined with a plastic bag since the paints do stay wet for quite some time.
This week's Inky Hot Mess projects!

Until next time *

Paints and metal can be fun! Try it out.

Friday, September 2, 2011

What an Inky Hot Mess!

So I bought this really cool set of metal drawers at Hobby Lobby last week. They retail for $79.99, but HL had a 50% off sale. Love those! I wanted some place a little unique to hold all of my ephemera. Hobby Lobby has had some great small storage pieces in the past so I went looking there. Success!

I should have taken a photo before I got started. Silly me didn't. The piece was just metal like the top and sides are now. I don't ink them up at all. The fronts of the drawers however had a little makeover.

How did I do this? Alcohol Inks from Tim Holtz (Ranger) of course! Oh and a few of Tim's Mixatives and Alcohol Blending Solution helped out a bit. These are the Alcohol Inks I used: Pesto, Currant, Clover, Sunset Orange, Meadow, Hazelnut, Raspberry, Raisin, Sail Boat Blue, Denim, Mushroom, Pool, Oregano, Pitch Black, Slate, Pebble, and Citrus. These are the Mixatives I used: Copper, Silver, and Pearl.

I also used a few sponges I have cut into quarters and my heat gun. My table always has clear vinyl covering it. This keeps the actual table looking good. The clear vinyl I purchased from Wal-Mart in the craft department. It was about $3 a yard. They do have ones that cost less. Our store was out when I purchased mine.

My table would certainly be interesting looking if I didn't have this protective covering. Between inks and mists oh what a mess! They all don't wipe up easily either. On top I have at least one sheet of newsprint. I buy my newsprint from Lowe's in the moving section. The have large sheets rolled up so there's no folds. This is much cheaper than buying newsprint in the art department in a craft store.

For this project I had three sheets of newsprint on top of the vinyl. It still bled through to the vinyl a little bit, but it didn't stick to the vinyl.

So how did I ink up the drawers? Well, I did each drawer one at a time. I stood the drawer up and dropped a few drops of three to four inks all over the front. Then I use one of the sponges and dab all over the front. Each drawer got a different sponge so the colors didn't all blend and become a muddy mess. I spritzed some Alcohol Blending Solution (yup, I have the squirt bottle they come in and I have a spray bottle with some also) on top of the ink drops. Using my heat gun, I blew around the ink and for the ones with the Mixatives I dropped them on before I dried the ink. I dried the ink with the heat gun. I didn't dry them completely because it would have taken forever and the drawers were getting a tad warm to the touch. I used a clean sponge to push them back into their cubby hole.

WARNING: The drawers do get VERY hot if you heat them too long. Also make sure you're in a very ventilated area. The heat with the ink and Mixatives can be a little odorous for some.

To protect my clothing, I wear a black apron. Why black? It hides the inky mess easily! I also have a towel handy. I have a few hand towels that are just for my studio. They are very interesting colors between the inks and paints oh baby! Oh and baby wipes are a must have. I have a box at all times on my studio table. I also always remove all of my rings and bracelets whenever playing with ink and paints. I don't want to see if the ink will come off my wedding rings later.

Until next time *

Get your ink on!

Monday, August 29, 2011

Sneak Peak in My New Studio

Let the studio tour begin! There's lots to see and this will take several posts and will probably take awhile. Please be patient. It is really worth it. I will be telling you were I got all of my storage pieces from! I have lots of people ask me about this frequently. I love cheap storage pieces. Why? The more I spend on storage, the less I have for new scrapping, stamping, and art supplies. I can always jazz up a storage unit. I can't jazz up stamps. It's amazing what a little bit of paint and elbow grease can do!

This is the main area I work in. The table is from Ikea and it was less than $50. It is a wooden folding table. I have it propped up on bed risers which I bought from Wal-Mart for about $7. In a post last week, I talked about my table being covered in vinyl. It's clear vinyl from Wal-Mart, but you can purchase it from any fabric store. They have different thicknesses so be sure you get one that will hold up. Some are super thin and didn't seem like they'd hold up to my inky messes. I cover my area with newsprint which I buy at Lowe's. Wal-Mart also has a bundle in the office aisle where they have the shipping/moving stuffs. I go through a lot of newsprint. It saves me from having to clean up lots of inks especially when I get out the mists and alcohol inks.

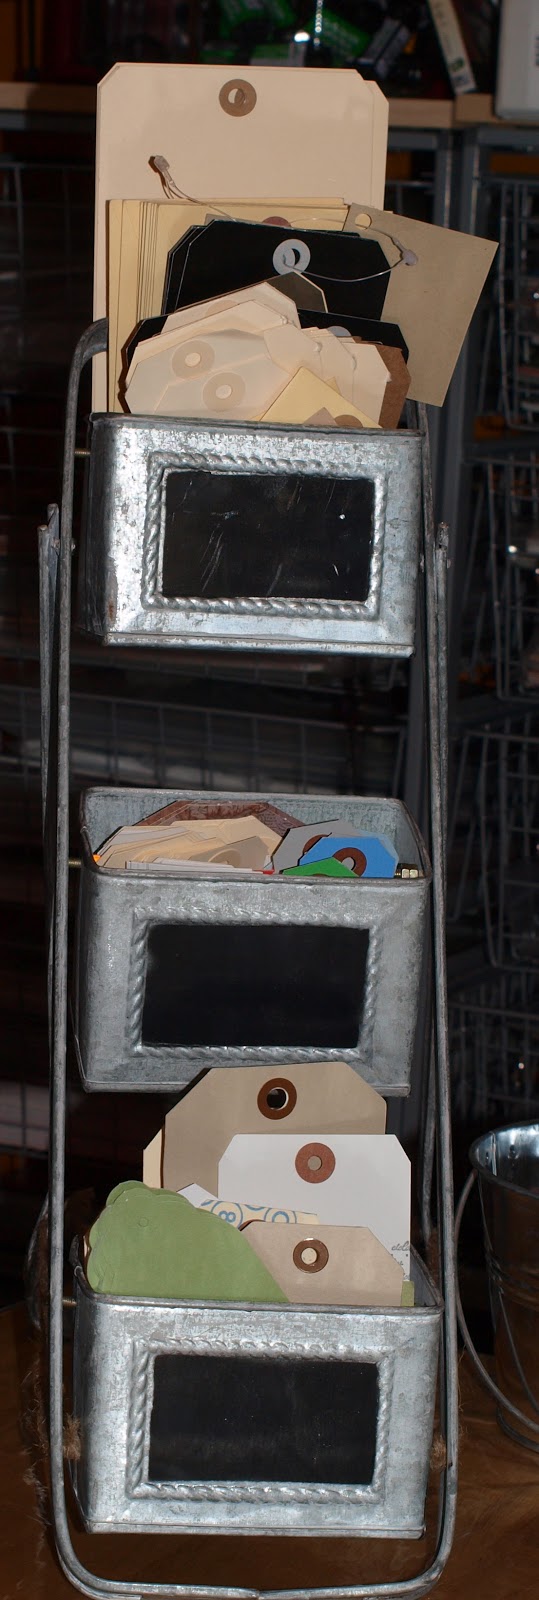
I have a small basket that holds the tags I have inked up. There's a metal stand (from Hobby lobby) that has three buckets full of blank tags waiting to be used up. A couple more containers from Hobby Lobby that hold my Liquid Appliques, Pixie Sticks glitters from Pink Paislee, writing markers, gel pens, scissors, etc. There are two glass candy jars (from Wal-Mart). One holds ribbon scraps and the other holds random embellishments that don't have a collection or there are only one or two left.

The metal buckets (from Target's $1 bins) hold my buttons. Well, some of the buttons. I have more button collections. These are just random buttons I have purchased. Not ones that are part of a paper collection or that can be purchased by the bag full in their color.

It's not in any of the pics, but my cup holder/trash bag hanger from Creative Memories is hanging on the left side of the table. Every paper craft must have a cup holder! Don't ever put a beverage on your crafty space! It always leads to disaster. Trust me on this one. been there. Done that. Rejected the t-shirt.

This wasn't on my studio table in my old studio. This is my collection of Close To My Heart inks. I have five of the towers they sell. Sadly, their ink towers only hold their inks. I would love someone to come up with a good ink storage piece that doesn't cost a lot of money and holds ink pads from everybody. I know it's a lot to ask for.

The little black box in front of the ink towers is my photo box form Creative Memories. This box holds the photos, layout info tags, and post its for the crops I go to. Never leave home without it!

Under the left side of the table is this set of bins from Ikea. They are like $20 for the rack and the bins! The top is an extra $7. This set of bins holds the majority of my sticker collection. The stickers that are part of a paper collection aren't in here. They're with their paper collection.

Until next time *

Have you played in your crafty space lately? Make some time for yourself!


Wednesday, March 23, 2011

Studio Space

I am frequently asked about my studio space. Lots of people know I relocated last year to South Carolina and built a new house. In said house, a planned studio space was built. I honestly thought it would be more than big enough. I felt like I would have extra room to grow and space to spread out. Boy, was I wrong! My quilting doesn't fit in the room at all. My computer desk and printers aren't in there either! The walk-in closet is stuffed to the gills. The studio its self has cathedral ceilings and I have things going up to where the wall bends. Some things are pretty close to the ceiling. If I ever build a house again, I now know I need a space double this size to really do what I want to do. Scary!

Today's peak into my studio is my work table. It's our old dining room table. We've had it for well over 10 years and it's pretty beat up. It's not so spiffy for dining on any more. Sadly, the leaf doesn't fit in it in the studio, but I am saving it for a day when I have the space.

In case you haven't figured this out, I like to play with ink. Ink is messy. There's no way around that especially when you're spraying ink all over the place. So I took a suggestion from my friend Kendra and covered my table with clear vinyl from Wal-Mart. It was something like $1.97 a yard. It took 2 yards. I am going to get some more so I can cover things on the table so they don't get inky.

The vinyl is so easy to clean up. Baby wipes. Paper towels. And I'm all done! When it starts to look funky and the inks are't easily cleaned up, I can replace it for cheap which is perfect!

There are some things that are always on my work table. That is their home. It's things I use often and need within easy reach.

Are you ready? Here we go!

To my right is my pen holder from Club SEI. You, too, can purchase this if you become a member this month! Don't laugh, but I also put my iPhone in it so I know where it is. I certainly don't want my iPhone inky! I also keep a pair of scissors in it.

Behind the pen holder is a set of attached buckets from Hobby Lobby. The buckets are metal and sort of look like a rustic copper.

They hold my glue pens, exacto knives, paint brushes, painting tools, and dry erase board markers, eraser, and cleaner.

Behind the copper buckets is this super cute little drawer cabinet from Hobby Lobby. It's filled with my collection of tags from Staples. Yes, Staples sells tags. They call them Shipping Tags. They're fairly inexpensive and for those who don't have a scrap or stamp store they work very well! I don't believe they are acid free so don't put them directly on your photos. They work the same as the ones I have purchased in scrappy stores!

The majority of my button collection sits straight across from me. The only buttons not included in this collection are the ones from Close To My Heart, Papertrey Ink, and DeNami Designs. Why are those separate? They come in little bags and are available in a variety of colors. I restock them when necessary.


My buckets are filled with buttons from wherever! I collect them from everything you can imagine. I have some from old clothes. I have purchased mixed bags of buttons. Some are retired colors from Close To My Heart. Some are from fabric and quilt shops. And others I have no idea how they stumbled into my life. I am grateful that they found their way to my studio though. A girl can never have too many buttons!


And to the left of my Buckets of Buttons is this really cool, metal, square bucket stand I got from Hobby Lobby. I have absolutely no idea what they call it or what they designed it for, but it sure is cool! It holds my collection of tags. I have manilla tags, white ones, a pile of colored ones, a bunch of stamped and printed ones, and I recently added some really cool black ones that have a finish on them that doesn't hold ink unless you get out your sander from Tim Holtz, but they sure are fun and funky!

Next to this stand are two glass penny candy jars. They are from Wal-Mart. I have seen similar ones at more expensive stores, but why spend $20 or more each one when they are about $5 at Wal-Mart? That's money taken out of my creating budget and who wants that? Not me!

They're basically scrap jars. One holds ribbon scraps and I have lots of them! The other one has random buttons, brads, paper flowers, and miscellaneous random embellishments. You know the kind of thing you think you use up and them discover you have one or two left. Or when you drop a container of brads and think you found them all and then miraculously you find a few on the floor squished in the carpet 3 months later. We've all be there! Just another reason I dislike carpet in my studio. Allergies, sand (I don't have dirt where I live. It's all sand like the beach and there's no water for miles! WEIRD!), pet fur, and ink all don't agree with carpet.

And last but not least on my left side are two more containers from Hobby Lobby. First there's a super cute metal bucket that has a divider up the middle of it so it's like there's two pockets inside it' It holds my American Crafts markers and my Pixie Dust from Pink Paislee.

To the left is a mini library card catalog drawer from - you guessed it - Hobby Lobby. (There's a Hobby Lobby about 2 miles from my house and I have to drive by it to go anywhere. It's also the only craft store in my area.) This holds my Liquid Appliques, box cutter, and my Sharpies.

I just discovered I don't have a photo of the whole work table! I will have to take one and add it later.

Until next time *

Remember, a girl can never have too many buttons!