Friday, April 8, 2011

Teresa Collins in Atlanta

The first weekend of March, there was a Cricut Circle Meetup in Atlanta. Shannon from Provo Craft brought us all kinds of goodies. She's crazy fun, too!

We had a very special guest join us for a few hours. The very fabulous Teresa Collins spent the afternoon with us! She's such wonderful person and mother. She's very down to earth, friendly, sweet, and kind. There's no crafty diva in her. She talked to everyone. I had spoken with her on Facebook a few weeks before and she remembered our conversation!

She brought us all a Make n Take. We got to use the Your Story Photo! We made a little photo book with papers and die cuts from Teresa's new Cricut Imagine Cartridge! She has a few Imagine cartridges coming out this year. They're not out yet. We were the first to get to play with pieces from them. They are just fabulous. I love her designs and style....very chic and fun!

Who's the gorgeous girl? She is Teresa's daughter Gentry. I just love her name!

The papers are in typical Teresa Collins fashion - damasks, animal prints, polka dots. The die cuts are also very true Teresa Collins - chandeliers, crowns, jewels, keys, frames. I just love her style!

The colors work for both female and male photos. They also work with photos from different occasions and they work for people, kids, events, parties, pets, pretty much anything! Love that!

The 5 page Make n Take photo book has a silver book cover from Your Story Photo. I assembled my book, but I haven't put my photos in yet. I was trying to figure out what to put in it. Teresa signed one of my pages at the Circle Meetup so why not put Teresa in it? I need to get my photos printed and put this baby together!

Until next time *

Have you used a Damask today?

Thursday, April 7, 2011

Blog Updates

Notice anything new? Any updates on here? I've been hard at work adding links. You will see down the right side a long list of labels. The labels link to every blog entry that topic is mentioned on.

On the left side there's a few new categories. There's a list of my favorite blogs. In the blogs list are also designer's blogs.

A little further down there's a list of store's websites. These are brick and mortar stores as well as online stores. This list doesn't include any manufacturers even though many have online stores.

Below the stores is the long list of manufacturer's. I will add to this whenever I find a company that I have to have some product from them. So I imagine this list is going to be quite long and added to frequently.

Finally, I have added a list of kit clubs. At one point, I belonged to every club on the list.

No one on any of these lists has paid me any compensation to be listed. These are companies I use and work with. If I am ever compensated - monetarily, merchandise, etc - I will clearly state this.

Keep checking the lists because they will be added to over time. I have already added several items since I created the lists. Almost every blog post has an addition.

Don't forget to follow me on Facebook and Twitter!

Until next time *

Have you played with your ink today?

Wednesday, April 6, 2011

Permanent

This piece kicks off a series I am in the process of creating. It's about as Mixed Media as you can get!

Let me introduce you to "Permanent." He was inspired by the song, "Permanent" from David Cook who was our American Idol in 2008. He wrote this song with Raine Maida from Our Lady Peace. "Permanent" is about his brother, Adam, and his battle with brain cancer. Adam fought bravely for more than 10 years and sadly lost his battle on May 2, 2009.


What's What? How'd I do that?

This is a combination of inks, acrylic paints, texture gels, Liquid Applique, Swavorski Crystals, and crackle medium. All of that Inky Hot Mess is on a 10" x 20" canvas panel from Dick Blick.

It all begin with 4 acrylic paints -  Black, Purple, and White from Anita's All Purpose Acrylic Craft Paint and True Navy from Apple Barrel/Plaid. The Anita's paints are from Hobby Lobby and the Apple Barrel one is from WalMart. Really those are the only paints used! I mixed and mixed and mixed until I had the colors I wanted. There's a few layers of paint also.

In person, you can really see the purple under the crackle medium. I love crackle and the whole distress look so whenever I can use something to make a piece look older, distressed, antiqued, worn, pretty much anything but brand new looking,  I can and do! The base looks blue in the photo, but it's really purple.

There's a very thick layer of Crackle Medium from Folk Art/Plaid. Then there's various blues on top. It crackled very well. The secret to a good crackle is a very thick layer of the crackle medium and let it dry completely. I leave things overnight at a bare minimum. Many times I'll leave things for a day or two. It depends on how crackle medium happy I got.

There's lots and lots and lots and lots of Iridescent Bright Silver Ink from Liquitex. The puffy clouds were created by using 3 tubes of White Liquid Applique and a heat gun. That stuff puffs up like crazy with the heat gun. Be careful not to over heat it or it will burn.

The bottom, as you can see, has a great deal of black. There's a couple layers of black acrylic paint, crackle medium, and more black paint. One thing I did with a few areas was use the heat gun to speed up the paint drying.

I was a bit impatient I'll admit it. I've had this in my head for a few weeks and have been collecting the necessary items so I really needed to get this out of my head and onto canvas. My impatience created a bubbling effect. An effect I do not recommend unless you either outside, have amazing air circulation, the windows open, a fan going, something for ventilation because bubbling paint stinks! It didn't photograph very well unfortunately. I do plan on taking some more photos outside on a really sunny day and am hoping I can get some better shots with natural light.

The black paint was covered with the Black Lava Texture Medium from Liquitex which I purchased from Dick Blick.  The glitter in it shows up very well in photos. There's a ton of hard, rough, black specks all over where you see the glitter.

The "Permanent" lettering was a very difficult thing to do. The inking was the easy part. Finding the stamps and stencils I needed was such a huge challenge with the look I had in mind! The "P" is a stencil from Hobby Lobby. The rest is from Inkadinkado's Coffee House alphabet clear stamp set. It was done with Jet Black StazOn. Coffee House is in a photo below so you can see more of the alphabet. It's a whimsically, cursive inspired set. Something different. I have been looking for uniquely different alphabets. Not an easy thing to find, I tell ya!

Wondering how I used an ink pad with a stencil? Easy! I used a dauber. I left it out overnight to dry and it's still soft and spongy. I wasn't sure if I would be able to use it again since I used StazOn which is a solvent based ink.

The white star is also done with StazOn. I recently purchased a few of the Opaque ink pads. I used Cotton White.

To clean my stamps after using StazOn, I used the StazOn cleaner, baby wipes, and a hand towel. After they were cleaned, I stamped the stamps and blocks on newsprint to dry. It's extremely important to thoroughly clean your stamps - especially clear stamps - immediately when using StazOn. It will damage your stamps if you do not clean them quickly. I left the stamps on the carrier sheet to dry overnight. Then I put them in their packaging. I never put away wet or damp stamps. I live in the South and I always worry about mold with our humidity.

I used the Bingo Alphabet My Acrylix Stamp set from Close To My Heart for the white star. Be sure when you're looking at purchasing an alphabet set to see what else is included. Sometimes there's brackets, dollar sign, ampersand (I learned that word on Wheel of Fortune and it's one of these &), question mark, exclamation point, flourishes, stars, hearts, etc. Extras that match an alphabet are always a good thing!

The final detail is the two teardrop Swarovski crystals coming off the base of the "P." I recently purchased them from ArtBeads. They have tons and tons of Swarovski crystals. You don't need to purchase 100 of them either. If you want one, you can get just one and they don't charge you extra. Their shipping is extremely reasonable - Free on orders $10 or more! They are attached with a tiny amount of Diamond Glaze.

That's all of the pieces and parts I used to create "Permanent." I hope you enjoy it as much as I do. I need to order a frame from Dick Blick ASAP! I really want to hang it up in my studio.

Until next time *

"Is this the moment where I look you in the eye?
Forgive my broken promise that you'll never see me cry" ~ "Permanent" ~ David Cook
Want to see the rest of the lyrics or hear the song? Here they both are on YouTube.

Tuesday, April 5, 2011

DeNami Design

A few months ago, there was a stamp expo in Columbia, SC and I had the opportunity to work for DeNami Design. They have some fantastic products! A girl can never have too many stamps, buttons, or ribbons. :)

DeNami Design designs their own line of wood mounted rubber stamps. One of the big things they have that I love is their line of chickies. Who doesn't love a little chicky? DeNami Design has a chicky for every holiday and occasion.

They also have a fabulous line of buttons! I already had several colors and now I have every color they carry. I just love buttons and can never have enough.

Their buttons come in zipper bags. I have put each color in a plastic jar with a cap and label. Each label says who the buttons are from and what color they are so restocking is easy as pie!

The last item I purchased was glitter ribbon! Seriously GLITTER RIBBON!! You really did read that. When I worked for them I got the silver one. And now I have the black one. They have a few other colors. I have never seen glitter ribbon anywhere else. The spool is 25 yards and is about $11!! Unbelievable Price. Loving the sparkle!

If you place an order on the DeNami Design website and you spend $100, you get free shipping! I am all about the free shipping! They also do lots of promotions. If you join their Facebook or Twitter, you'll see all of the promotions, videos, and blogs. They're a very nice family to work for!

Until next time *

Got glitter?

Thursday, March 31, 2011

O Dick Blick How I Love Thee

One of my recent online shopping excursions was to Dick Blick. Dick Blick is like dreaming about heaven except that they sell tons of art supplies. They have an old fashioned paper catalog which I love, an online store, and brick and mortar stores all over the country. The selection and quality is rather impressive.

They have some nifty sizes and shapes for canvases and canvas panels. Got me some brushes and drafting tape. Can never have enough drafting tape!

This is the assortment of canvases and canvas panels I got. The 4" x 4" ones are super cute! The 10" x 20" and 15" x 30" are pretty cool! I like how they look quite a bit.

Oh happy day! One word. Ink. Nuff said!

Look at them all! Oh so pretty. One cool thing about Liquitex inks is that they are pigment colored. The same pigments that are used in artist paints. Very deep, rich colors. No pastels here!

Dick Blick also has a fabulous supply of Gessoes and Gel Mediums. Oh they have a package of 3 different waxed threads - pretty much the same as waxed Irish Linen.  And a decent size bottle of India Ink in black.

The Gel Mediums I got were textured ones except for one. Black Lava is so cool! It has ground black flakes and some look like silver glitter when it's wet.

I also got the Fine Natural Sand Gel. When it dries, it's a glossy sand texture. You can color the sand gel. Gotta try that!

White Opaque Flakes just sounded so cool that I had to get some just to play. There's opaques flakes in this bad boy and you can add paint to color them. Can't wait to play with these!

The last one is Matte Gel. He sounds so drab compared to his friends. But he's got jazzy friends so it's all good.

I have started the first in a series of projects using all of these goodies! I'm waiting for things to dry and one final order to be delivered. You hear that USPS? Start moving my package like you're Kevin Harvick moving Jimmie Johnson out of the way at Fontana!

Chances are some time over the weekend, this project will be revealed. If it's not completed, there will be some teasers pics posted! I'm sooo excited about this series of projects!

Until next time *

What can you do with a canvas?

Friday, March 25, 2011

Cricut Circle Meetup

THE beginning of March led me on a road trip to Atlanta. Why Atlanta? To attend a Cricut Circle Meetup!

There were several firsts at the Atlanta Cricut Circle Meetup. First off, we were treated to some brand new Circle bling! The flair on the right is something that will be happening at all Circle get togethers. There are 50 different pieces of flair. How cute that I have a Georgia one. Sure hope we have a South Carolina event. Ooh a North Carolina event would also be fabulous!

The little navy guy on the left is the Circle Charm for the first year of the Circle. The same color charm is used for the whole year so you have a long time to get one! Provo Craft told us what color will be coming out with our next year. I'm sworn to secrecy! But I'm am telling you, most girls will love it.

There were lots of other goodies, too! Some of us even scrapbooked a little. You could hear the hum of Cricut die cutting machines all day long.

These wooden cut outs are only available at Circle events. The one on the left is the Circle logo. The one on the right is the Cricut logo. And in the middle is the Eiffel Tower from French Manor which was the first Cricut Cartridge sent to Circle members. I haven't decided what to do with the yet. Paper? Ink? Paper? Glitter? Ribbon? Bling? I guess we'll have to wait and see.

At all Circle events, we're asked to make our own unique Calling Cards. This shows you all of the ones I received. Sadly, I think I missed some people as there were about 40 of us there and I don't have 40. Kinda sad about that! Some of them were truly amazing and took quite some time to put together. Hey, mine isn't in this photo!

Mine is in this photo! Along with the sock monkey one my friend Kendra (aka the Scrappin' Cricut) made.

I also have Susan's and the amazing box she made for everyone at the Meetup! Turns out Susan lives in the development next to me! It truly is a small world. Crazy that I had to go 3 1/2 hours away to meet her!

My Calling Card is the Georgia one. The pieces are on black cardstock from Close To My Heart. I used the 50 States Cricut Cartridge to make the Cherokee Rose (Georgia's state flower) and the Georgia in the center with a pewter brad. Georgia was cut from Taffy cardstock from Close To My Heart and sprayed with Terra Cotta Color Wash and Copper Perfect Pearls Mist from Ranger.

And finally, there were prizes galore! I think everyone got something. There were some HUGE prizes and some small prizes. One lucky gal one a Cricut Imagine! Her reaction was truly amazing. I was so happy for Amy to win. She was one of the folks who helped arrange the Meetup. That's not why she won it. The prizes are given away completely randomly. Our Calling Cards were put in a bowl and our cards were drawn we then went to a bowl and drew a number. That number was written on a prize. I won prize 22 which was the Cheerful Seasons Cricut Cartridge from Creative Memories. Notice the big 22 written by Shannon from Provo Craft on it? Pretty cool prize if you ask me!

There was other HUGE surprise for us. A little lady named Teresa Collins paid us a visit. I'll tell you about that fabulous woman later this week! She gave us an incredible project. It was another first!

Until next time *

What goes round and round? The Circle!

Wednesday, March 23, 2011

Studio Space

I am frequently asked about my studio space. Lots of people know I relocated last year to South Carolina and built a new house. In said house, a planned studio space was built. I honestly thought it would be more than big enough. I felt like I would have extra room to grow and space to spread out. Boy, was I wrong! My quilting doesn't fit in the room at all. My computer desk and printers aren't in there either! The walk-in closet is stuffed to the gills. The studio its self has cathedral ceilings and I have things going up to where the wall bends. Some things are pretty close to the ceiling. If I ever build a house again, I now know I need a space double this size to really do what I want to do. Scary!

Today's peak into my studio is my work table. It's our old dining room table. We've had it for well over 10 years and it's pretty beat up. It's not so spiffy for dining on any more. Sadly, the leaf doesn't fit in it in the studio, but I am saving it for a day when I have the space.

In case you haven't figured this out, I like to play with ink. Ink is messy. There's no way around that especially when you're spraying ink all over the place. So I took a suggestion from my friend Kendra and covered my table with clear vinyl from Wal-Mart. It was something like $1.97 a yard. It took 2 yards. I am going to get some more so I can cover things on the table so they don't get inky.

The vinyl is so easy to clean up. Baby wipes. Paper towels. And I'm all done! When it starts to look funky and the inks are't easily cleaned up, I can replace it for cheap which is perfect!

There are some things that are always on my work table. That is their home. It's things I use often and need within easy reach.

Are you ready? Here we go!

To my right is my pen holder from Club SEI. You, too, can purchase this if you become a member this month! Don't laugh, but I also put my iPhone in it so I know where it is. I certainly don't want my iPhone inky! I also keep a pair of scissors in it.

Behind the pen holder is a set of attached buckets from Hobby Lobby. The buckets are metal and sort of look like a rustic copper.

They hold my glue pens, exacto knives, paint brushes, painting tools, and dry erase board markers, eraser, and cleaner.

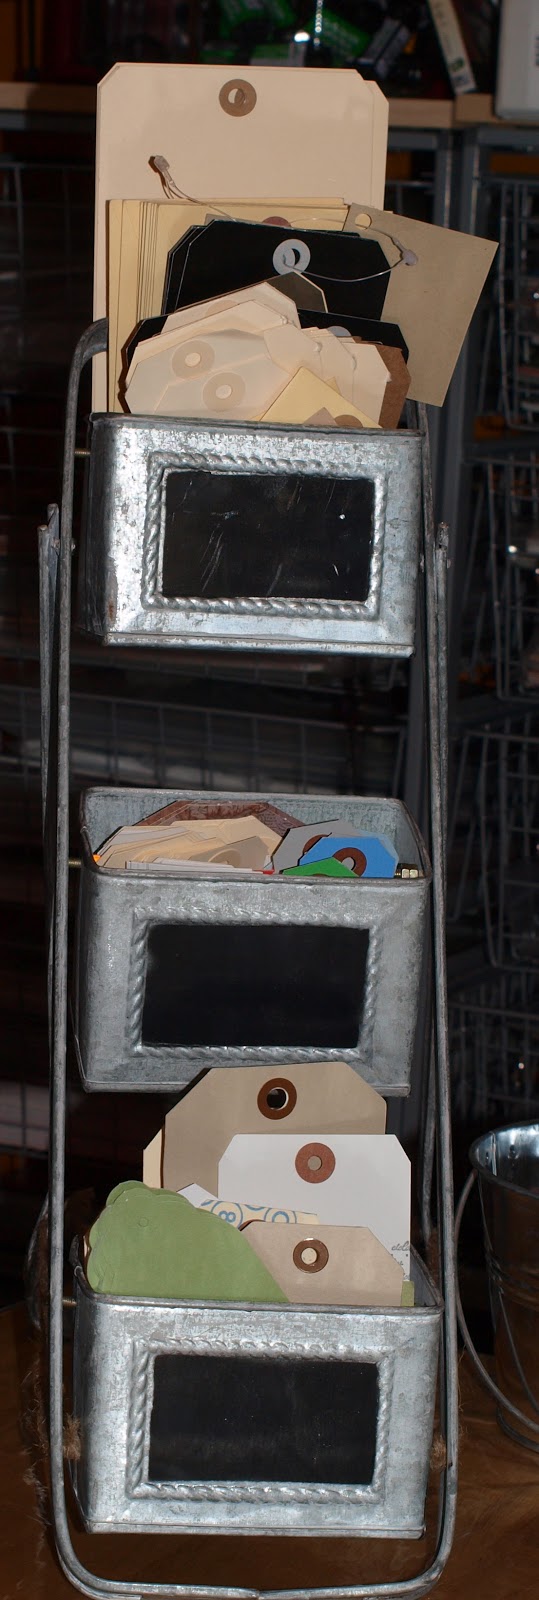
Behind the copper buckets is this super cute little drawer cabinet from Hobby Lobby. It's filled with my collection of tags from Staples. Yes, Staples sells tags. They call them Shipping Tags. They're fairly inexpensive and for those who don't have a scrap or stamp store they work very well! I don't believe they are acid free so don't put them directly on your photos. They work the same as the ones I have purchased in scrappy stores!

The majority of my button collection sits straight across from me. The only buttons not included in this collection are the ones from Close To My Heart, Papertrey Ink, and DeNami Designs. Why are those separate? They come in little bags and are available in a variety of colors. I restock them when necessary.


My buckets are filled with buttons from wherever! I collect them from everything you can imagine. I have some from old clothes. I have purchased mixed bags of buttons. Some are retired colors from Close To My Heart. Some are from fabric and quilt shops. And others I have no idea how they stumbled into my life. I am grateful that they found their way to my studio though. A girl can never have too many buttons!


And to the left of my Buckets of Buttons is this really cool, metal, square bucket stand I got from Hobby Lobby. I have absolutely no idea what they call it or what they designed it for, but it sure is cool! It holds my collection of tags. I have manilla tags, white ones, a pile of colored ones, a bunch of stamped and printed ones, and I recently added some really cool black ones that have a finish on them that doesn't hold ink unless you get out your sander from Tim Holtz, but they sure are fun and funky!

Next to this stand are two glass penny candy jars. They are from Wal-Mart. I have seen similar ones at more expensive stores, but why spend $20 or more each one when they are about $5 at Wal-Mart? That's money taken out of my creating budget and who wants that? Not me!

They're basically scrap jars. One holds ribbon scraps and I have lots of them! The other one has random buttons, brads, paper flowers, and miscellaneous random embellishments. You know the kind of thing you think you use up and them discover you have one or two left. Or when you drop a container of brads and think you found them all and then miraculously you find a few on the floor squished in the carpet 3 months later. We've all be there! Just another reason I dislike carpet in my studio. Allergies, sand (I don't have dirt where I live. It's all sand like the beach and there's no water for miles! WEIRD!), pet fur, and ink all don't agree with carpet.

And last but not least on my left side are two more containers from Hobby Lobby. First there's a super cute metal bucket that has a divider up the middle of it so it's like there's two pockets inside it' It holds my American Crafts markers and my Pixie Dust from Pink Paislee.

To the left is a mini library card catalog drawer from - you guessed it - Hobby Lobby. (There's a Hobby Lobby about 2 miles from my house and I have to drive by it to go anywhere. It's also the only craft store in my area.) This holds my Liquid Appliques, box cutter, and my Sharpies.

I just discovered I don't have a photo of the whole work table! I will have to take one and add it later.

Until next time *

Remember, a girl can never have too many buttons!